Before you started, you will need to open my.itldc.com, select your service and go to “IP addresses“.

You will need Mask and IP address.
CentOS 7, 8, Stream #
STEP 1: Connect to your server using ssh.
STEP 2: To check your IP configuration – enter the following command:
ip addrSample output:
t qlen 1000
    link/loopback 00:00:00:00:00:00 brd 00:00:00:00:00:00
    inet 127.0.0.1/8 scope host lo
       valid_lft forever preferred_lft forever
    inet6 ::1/128 scope host
       valid_lft forever preferred_lft forever
2: ens3: <BROADCAST,MULTICAST,UP,LOWER_UP> mtu 1500 qdisc fq_codel state UP group default qlen 1000
    link/ether xx:xx:xx:xx:xx:xx brd ff:ff:ff:ff:ff:ff
    inet xxx.xxx.xxx.xxx/23 brd xxx.xxx.xxx.xxx scope global noprefixroute ens3
       valid_lft forever preferred_lft forever
    inet6 xxxx:xxxx::xxx scope global noprefixroute
       valid_lft forever preferred_lft forever
STEP 3: Go to file “ifcfg-ens3” using nano, or another editor that you like. Type the following command:
nano /etc/sysconfig/network-scripts/ifcfg-ens3STEP 4: Open this file and copy selected items:
BOOTPROTO="none"
DEVICE="ens3"
HWADDR="XX:XX:XX:XX:XX:XX"
ONBOOT="yes"
IPADDR="XXX.XXX.XXX.XXX"
NETMASK="XXX.XXX.XXX.XXX"
GATEWAY="XXX.XXX.XXX.XXX"
DNS1=8.8.8.8
DNS2=1.1.1.1
IPV6INIT="yes"
IPV6ADDR="XXXX:XXXX::XXX/XX"
IPV6_DEFAULTGW="XXXX:XXXX::XXXX"
STEP 5: Create and open new file using “nano /etc/sysconfig/network-scripts/ifcfg-ens3:0“. Paste copied items and replace “DEVICE” to eth3:0, “IPADDR” to your second IP and “NETMASK” to mask of this IP address.
DEVICE="eth3:0"
IPADDR="XXX.XXX.XXX.XXX"
NETMASK="XXX.XXX.XXX.XXX"
ONBOOT="yes"NOTE: If you want to add more IPs, for 3rd you will need to create file “ifcfg-ens3:1“, for 4th “ifcfg-ens3:1” etc.
STEP 6: Save the changes. In nano you will need to press “Ctrl+X” and then “Y” to save changes. Press “Enter” to exit nano.
Debian 10, 11 / Ubuntu 16.04, 18.04, 20.04, 22.04 #
STEP 1: Connect to your server using ssh.
STEP 2: To check your IP configuration – enter the following command:
ip addrSample output:
1: lo: <LOOPBACK,UP,LOWER_UP> mtu 65536 qdisc noqueue state UNKNOWN group default qlen 1000
    link/loopback 00:00:00:00:00:00 brd 00:00:00:00:00:00
    inet 127.0.0.1/8 scope host lo
       valid_lft forever preferred_lft forever
    inet6 ::1/128 scope host
       valid_lft forever preferred_lft forever
2: ens3: <BROADCAST,MULTICAST,UP,LOWER_UP> mtu 1500 qdisc fq_codel state UP group default qlen 1000
    link/ether xx:xx:xx:xx:xx:xx brd ff:ff:ff:ff:ff:ff
    altname enp0s3
    inet xxx.xxx.xxx.xxx/23 brd xxx.xxx.xxx.xxx scope global ens3
       valid_lft forever preferred_lft forever
    inet6 xxxx:xxxx::xxx scope global
       valid_lft forever preferred_lft forever
    inet6 xxxx:xxxx::xxx scope link
       valid_lft forever preferred_lft forever
STEP 3: Go to file “interfaces” using nano, or another editor that you like. Type the following command:
nano etc/network/interfacesSTEP 4: Add the parts that are in red and enter your IP address on “address”. It should look like this example:
# The primary network interface
auto ens3
iface ens3 inet static
    address   xxx.xxx.xxx.xxx
    netmask   255.255.254.0
    gateway   xxx.xxx.xxx.xxx
    hwaddress ether xx:xx:xx:xx:xx:xx
    dns-nameservers 1.1.1.1 8.8.8.8

auto ens3:0
iface ens3:0 inet static
    address   xxx.xxx.xxx.xxx
    netmask   xxx.xxx.xxx.xxx

iface ens3 inet6 static
    address   xxxx:xxxx::xxxx
    netmask   32
    gateway   xxxx:xxxx::xxxx
    dns-nameservers 1.1.1.1 8.8.8.8
NOTE: If you want to add more IPs, you can add them by adding similar parts, but named, for example, ens3:1, ens3:2 etc.
STEP 5: Save the changes.
Windows Server 2012, 2016, 2019 #
NOTE: For this example was used Windows 2012, but you can use these instructions for newer versions.
STEP 1: Connect to your service using RDP client or VNC console. Login as an Administrator.
STEP 2: Go to start menu and click on search button.
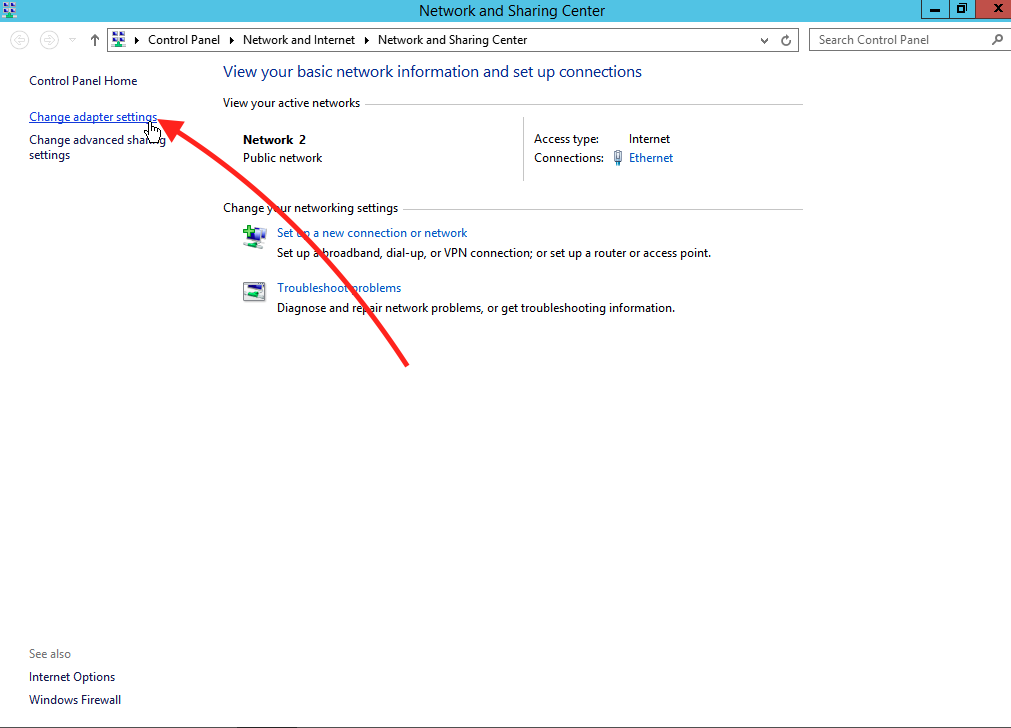
STEP 3: Type “Network and Sharing Center”.

STEP 4: Click on Change adapter settings
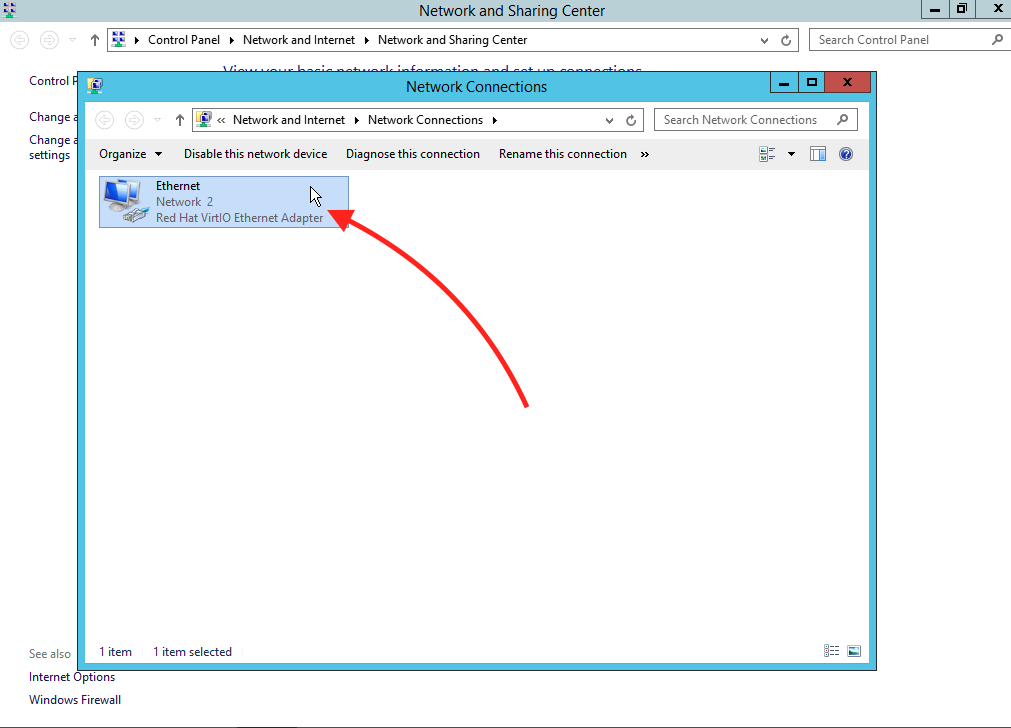
STEP 5: Click on the “Ethernet” to select it.
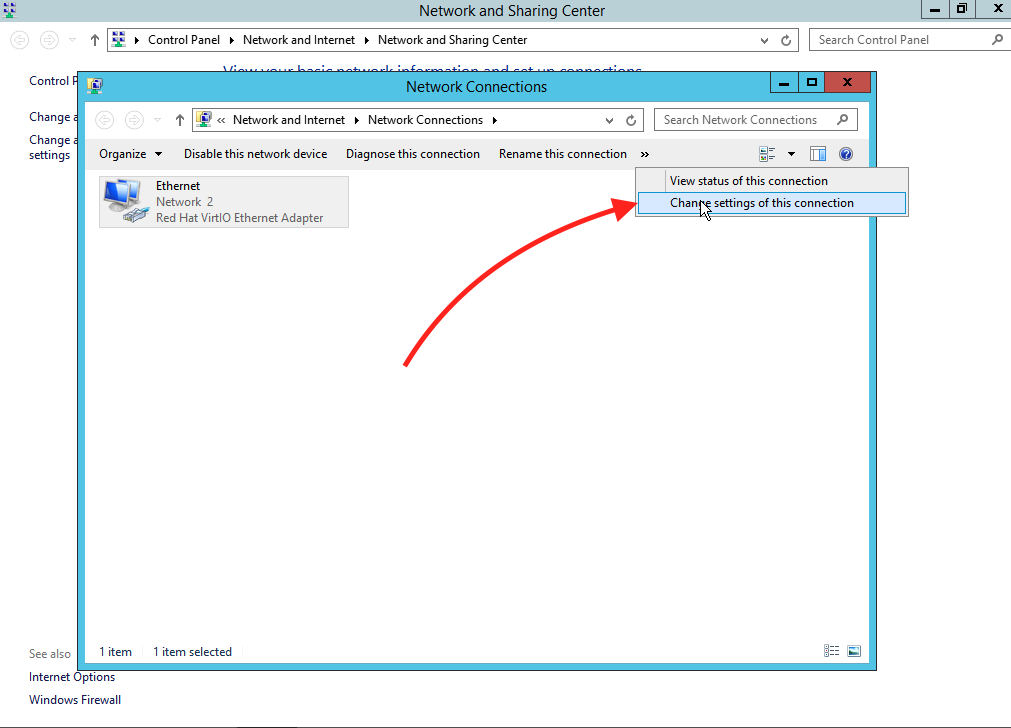
STEP 6: Then, click on “Change settings of this connection“.
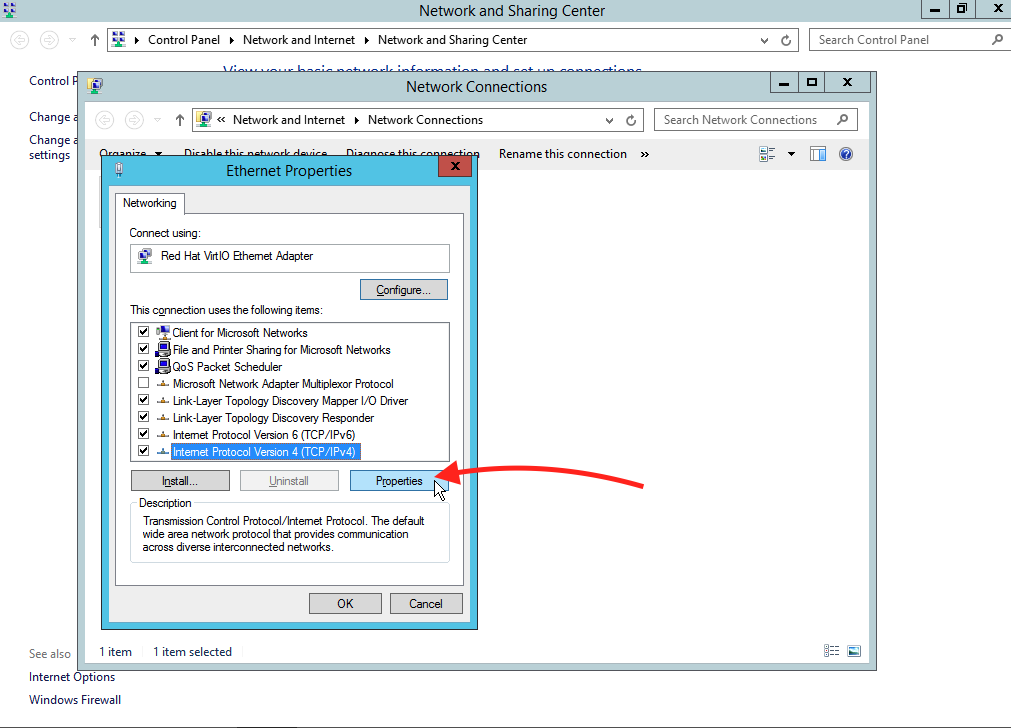
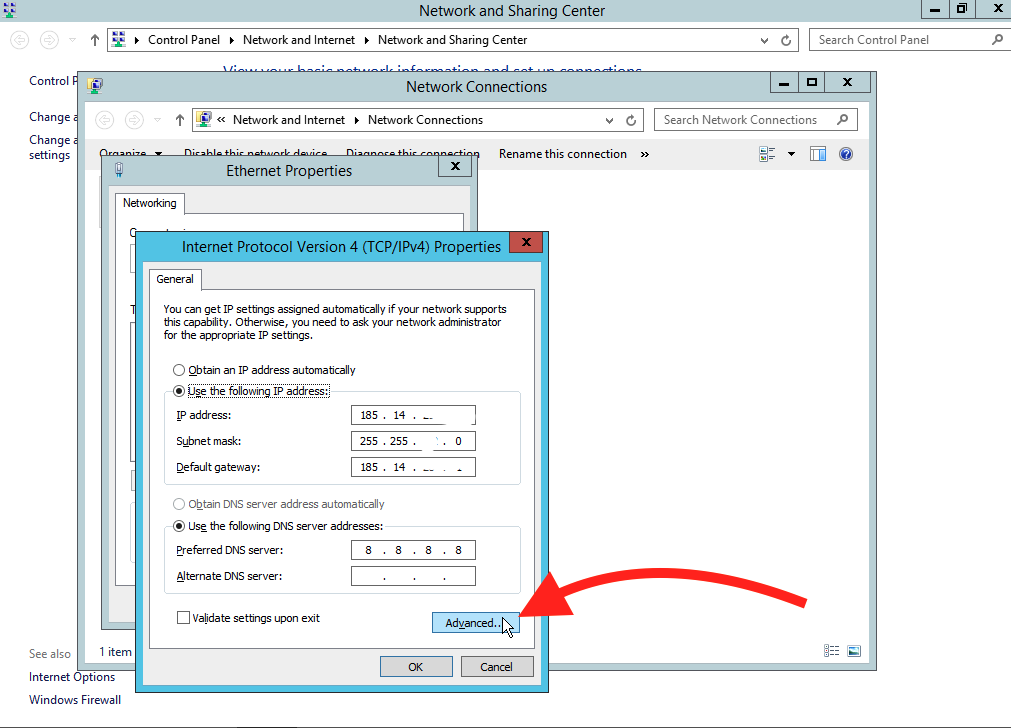
STEP 7: Here, click on “Internet Protocol Version 4 (TCP/IPv4)“
STEP 8: Click on “Advanced…“.
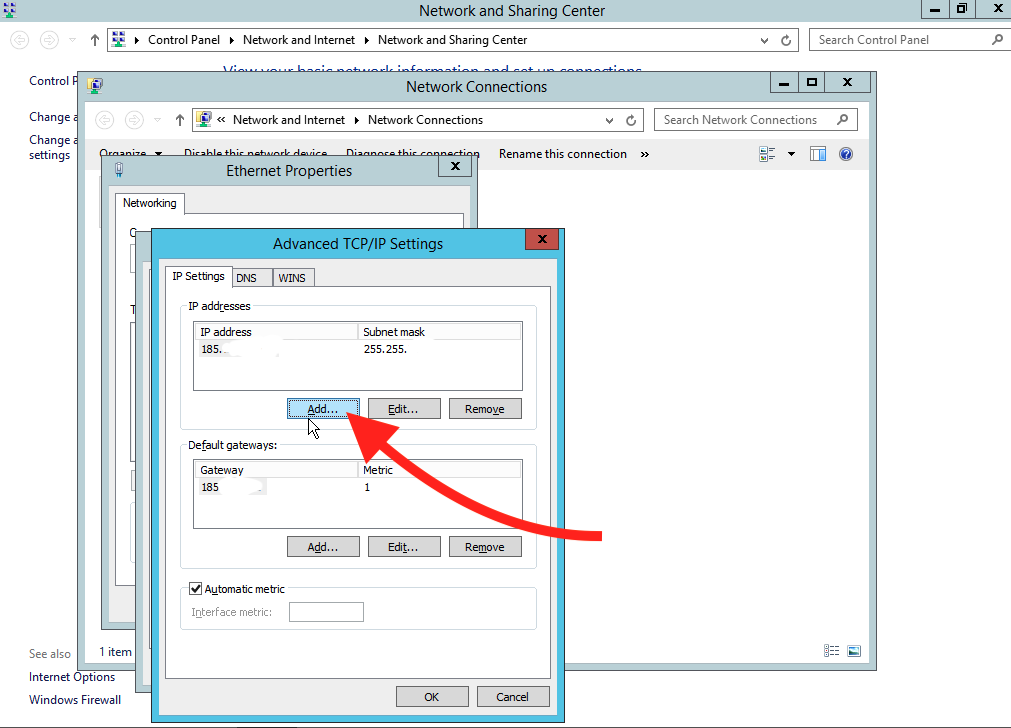
STEP 9: In IP addresses, click “Add…“.
STEP 10: Enter your second IP.
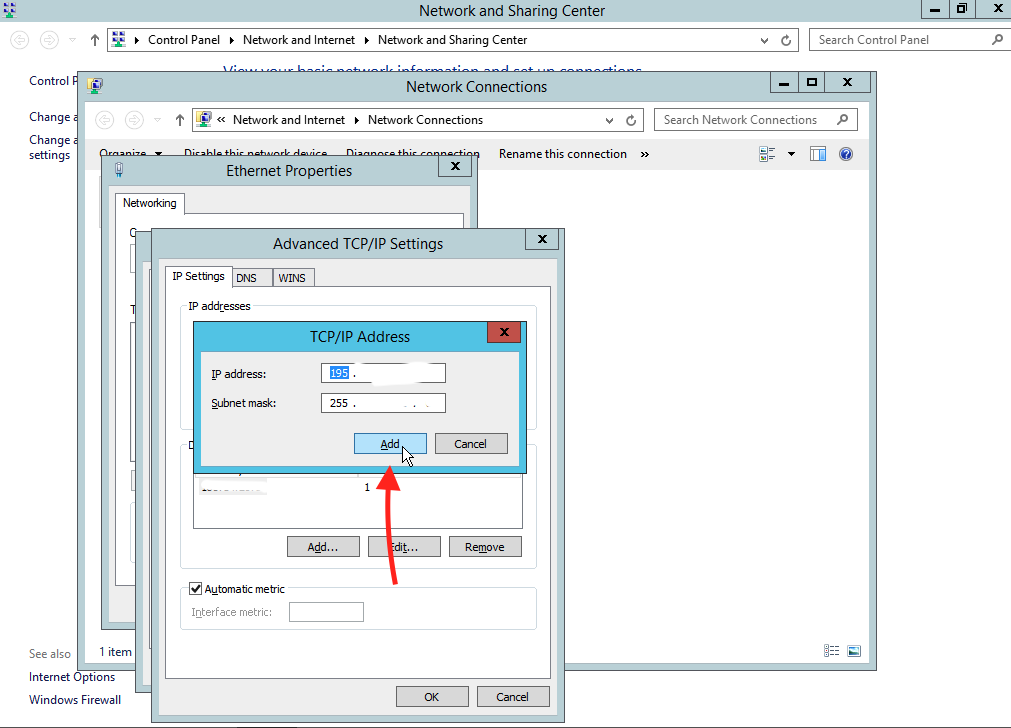
STEP 11: Click “ok” to save the changes.


